

第一種安裝方式:下載360的驅動大師安裝(最簡單)
第二種去官網下載驅動程序,https://www.nvidia.cn/Download/index.aspx?lang=cn。輸入顯卡的型號查找然后下載安裝。手動搜索驅動程序,查找對應顯卡的驅動。
打開NVIDIV設置,如上圖,雙擊打開軟件。選擇"幫助—》系統信息",查看NVCUDA.DLL后面的信息。我電腦的版本十一10.0.132的,所以選擇CUDA不能低于這個版本,否則會有兼容性的問題。
網站地址:,
選擇10.0的版本
點擊進去,選擇和自己電腦相匹配的操作系統環境。
現下圖所示界面后,點擊選擇"編程語言"下的Visual C++(或其他需要用到的語言,如Python),點擊"下一步",注意:請最好不要選擇"典型",因為在最新的VS默認安裝包中并不包含最基本的C++語言,而且系統會默認安裝許多很少用到的安裝包,這樣會使每次VS的運行加載嚴重減慢。
下面就是等待安裝的過程了,這個過程等待時間較長,可以去做其它事情
當看到下圖所示的界面時,程序就安裝完成了
雙擊剛才下載的CUDA安裝包,點擊"OK"
點擊"同意并繼續"
然后選擇"自定義安裝"
點擊"下一步"
點擊"下一步",等待安裝完成。
驗證是否安裝成功:
打開CMD輸入: nvcc -V
nvcc: NVIDIA (R) Cuda compiler driver
Copyright (c) 2005-2018 NVIDIA Corporation
Built on Sat_Aug_25_21:08:04_Central_Daylight_Time_2018
Cuda compilation tools, release 10.0, V10.0.130
已經自動添加系統變量。
打開C:\ProgramData\NVIDIA Corporation\CUDA Samples\v10.0,用VS2015打開(注:要以管理員的身份運行)。
編譯測試文件
· C:\ProgramData\NVIDIA Corporation\CUDA Samples\v10.0下找到Samples_vs2015.sln并打開
· 編譯:選擇Release x64,右鍵1_Utilities,點擊"生成"
驗證deviceQuery和bandwidthTest
打開命令提示符:定位到 c:\ProgramData\NVIDIA Corporation\CUDA Samples\v10.0\bin\win64\Release
分別輸入deviceQuery,bandwidthTest并運行,出現如下類似信息便說明CUDA安裝成功
配置環境變量
1、確認系統變量中:CUDA_PATH和CUDA_PATH_V10.0已經存在
2、我們還需要在環境變量中添加如下幾個變量:
CUDA_SDK_PATH = C:\ProgramData\NVIDIA Corporation\CUDA Samples\v10.0
CUDA_LIB_PATH = %CUDA_PATH%\lib\x64
CUDA_BIN_PATH = %CUDA_PATH%\bin
CUDA_SDK_BIN_PATH = %CUDA_SDK_PATH%\bin\win64
CUDA_SDK_LIB_PATH = %CUDA_SDK_PATH%\common\lib\x64
可在cmd中查看配置情況(命令:set cuda)
打開網站:
找對應的版本。我安裝的是10.0的,所以選擇10.0的最新版本
選擇對應的操作系統版本下載。下載之后是個壓縮包文件,解壓縮:
將CUDA\bin、CUDA\include、CUDA\lib中的內容拷貝到相應的C:\Program Files\NVIDIA GPU Computing Toolkit\CUDA\v10.0文件路徑下即可:
按道理來講到這里cuDNN應該已經算安裝完畢了,但是參考一個博文,還是添加了cuDNN的環境變量,不知道是否有必要?
這是機器未來的第2篇文章,由機器未來原創
寫在前面:
? 博客簡介:專注AIoT領域,追逐未來時代的脈搏,記錄路途中的技術成長!? 專欄簡介:記錄博主從0到1掌握物體檢測工作流的過程,具備自定義物體檢測器的能力? 面向人群:具備深度學習理論基礎的學生或初級開發者? 專欄計劃:接下來會逐步發布跨入人工智能的系列博文,敬請期待? Python零基礎快速入門系列? 快速入門Python數據科學系列? 人工智能開發環境搭建系列? 機器學習系列? 物體檢測快速入門系列? 自動駕駛物體檢測系列? ......
@[toc]
windows GPU深度學習開發環境的安裝包含顯卡驅動、cuda、cuDNN深度學習加速包、anaconda、tensorflow的安裝以及安裝源的配置,理解了本文,還可以安裝pytorch等其他開發框架。
fengmian
Nvidia顯卡、顯卡驅動、cuda工具套件、cuDNN工具包四部分構成。
目前支持深度學習的顯卡基本上就是N卡,不論是硬件性能,還是最新的論文支持基本上都是N卡,所以不用在這里糾結了,采購時一定要上N卡。
下載地址:https://www.nvidia.com/download/index.aspx?lang=en-us
2
根據提供的下載鏈接選擇電腦對應的最新顯卡驅動安裝即可,這里需要記錄一下顯卡驅動的版本,安裝cuda要用,我這臺老電腦顯卡驅動的文件名為425.31-notebook-win10-64bit-international-whql.exe,版本是425.31。
PS C:\Users\zhoushimin> nvidia-smi
Mon Apr 04 22:00:37 2022
+-----------------------------------------------------------------------------+
| NVIDIA-SMI 426.00       Driver Version: 426.00       CUDA Version: 10.1     |
|-------------------------------+----------------------+----------------------+
| GPU  Name            TCC/WDDM | Bus-Id        Disp.A | Volatile Uncorr. ECC |
| Fan  Temp  Perf  Pwr:Usage/Cap|         Memory-Usage | GPU-Util  Compute M. |
|===============================+======================+======================|
|   0  GeForce GT 650M    WDDM  | 00000000:01:00.0 N/A |                  N/A |
| N/A   36C    P0    N/A /  N/A |     40MiB /  2048MiB |     N/A      Default |
+-------------------------------+----------------------+----------------------+

+-----------------------------------------------------------------------------+
| Processes:                                                       GPU Memory |
|  GPU       PID   Type   Process name                             Usage      |
|=============================================================================|
|    0                    Not Supported                                       |
+-----------------------------------------------------------------------------+
如果提示'nvidia-smi' 不是內部或外部命令,也不是可運行的程序,則可能環境變量沒有配置好,需要將 C:\Program Files\NVIDIA Corporation\NVSMI 目錄添加到系統環境變量中關閉命令提示符,重新打開輸入 nvidia-smi 就可以看到上面的輸出結果了。
7
PS C:\Users\zhoushimin> nvcc -V
nvcc: NVIDIA (R) Cuda compiler driver
Copyright (c) 2005-2019 NVIDIA Corporation
Built on Sun_Jul_28_19:12:52_Pacific_Daylight_Time_2019
Cuda compilation tools, release 10.1, V10.1.243
可以看到cuda版本為10.1
type "C:\Program Files\NVIDIA GPU Computing Toolkit\CUDA\v10.1\include\cudnn.h" | less按回車鍵,直到輸出結果如下:
#ifndef CUDNN_VERSION_H_
#define CUDNN_VERSION_H_

#define CUDNN_MAJOR 7
#define CUDNN_MINOR 6
#define CUDNN_PATCHLEVEL 5

#define CUDNN_VERSION (CUDNN_MAJOR * 1000 + CUDNN_MINOR * 100 + CUDNN_PATCHLEVEL)

#endif /* CUDNN_VERSION_H */
可知cuDNN的版本為7.6.5
如果找不到相關信息,可以使用如下命令測試
type "C:\Program Files\NVIDIA GPU Computing Toolkit\CUDA\v10.1\include\cudnn_version.h" | lessAnaconda,中文大蟒蛇,是一個開源的Python發行版本,其包含了conda、Python等180多個科學包及其依賴項。其簡化了python軟件包的安裝,并且自動關聯依賴,自動下載依賴的軟件包,避免不必要的沖突,另外,anaconda最重要的功能就是創建虛擬環境,實現各種項目開發框架及版本的隔離。
Anaconda的官方下載速度較慢,推薦使用清華大學的源下載,盡量選擇日期較新的版本,根據操作系統版本選擇對應的版本。
注意事項:不要有中文路徑,安裝過程無腦下一步即可。 安裝完畢之后,python、pip等軟件均已安裝完畢。
在命令提示符輸入conda -V查看conda版本,以確認conda環境是否生效。
PS C:\Users\zhoushimin> conda -V
conda 4.10.3由于Anaconda官方服務器在國外,安裝python軟件包時下載速度巨慢,因此需要配置國內安裝源,在這里使用清華大學的第三方源。
channels:
- defaults
show_channel_urls: true
default_channels:
- https://mirrors.tuna.tsinghua.edu.cn/anaconda/pkgs/main
- https://mirrors.tuna.tsinghua.edu.cn/anaconda/pkgs/r
- https://mirrors.tuna.tsinghua.edu.cn/anaconda/pkgs/msys2
custom_channels:
conda-forge: https://mirrors.tuna.tsinghua.edu.cn/anaconda/cloud
msys2: https://mirrors.tuna.tsinghua.edu.cn/anaconda/cloud
bioconda: https://mirrors.tuna.tsinghua.edu.cn/anaconda/cloud
menpo: https://mirrors.tuna.tsinghua.edu.cn/anaconda/cloud
pytorch: https://mirrors.tuna.tsinghua.edu.cn/anaconda/cloud
pytorch-lts: https://mirrors.tuna.tsinghua.edu.cn/anaconda/cloud
simpleitk: https://mirrors.tuna.tsinghua.edu.cn/anaconda/cloudconda clean -iconda create -n myenv numpy測試時會發現下載包的速度杠杠的,測試完畢后,刪除myenv虛擬環境
conda remove -n myenv --allconda config --remove-key channels使用pip安裝軟件包時,有些安裝包下載速度特別慢,可以選擇國內的安裝源。
以下安裝源可以選擇:
# 清華大學
https://pypi.tuna.tsinghua.edu.cn/simple/

# 阿里云
http://mirrors.aliyun.com/pypi/simple/

# 中國科技大學
https://pypi.mirrors.ustc.edu.cn/simple以安裝tensorflow使用阿里云安裝源為例,在-i后面指定安裝源即可
pip install tensorflow_gpu==2.3 -i http://mirrors.aliyun.com/pypi/simple/做如下配置后,無需再使用-i選項
pip install pip -U #升級 pip 到最新的版本后進行配置:
pip config set global.index-url https://mirrors.aliyun.com/pypi/simple/如果安裝源出現異常,恢復官方安裝源的方式如下:
pip config unset global.index-url`為了隔離不同項目可能對應的不同tensorflow版本或pytorch或python版本,強烈建議使用conda創建不同的虛擬環境以實現各種不同的開發環境的隔離。
我們需要根據開發框架、cuda版本等信息綜合選擇合適的開發環境,強烈不建議自行搭建開發環境適配開源框架,你會懷疑人生,時間周期可能是星期級別!
博主的需求是安裝物體檢測API[OBJECT DETECTION API[1]],根據項目的最低配置可以了解到支持的是tensorflow-2.2 python3.6
10
- 查看cuda、tensorflow對照關系表
- [經過測試的構建配置](https://tensorflow.google.cn/install/source?hl=zh-cn#gpu)
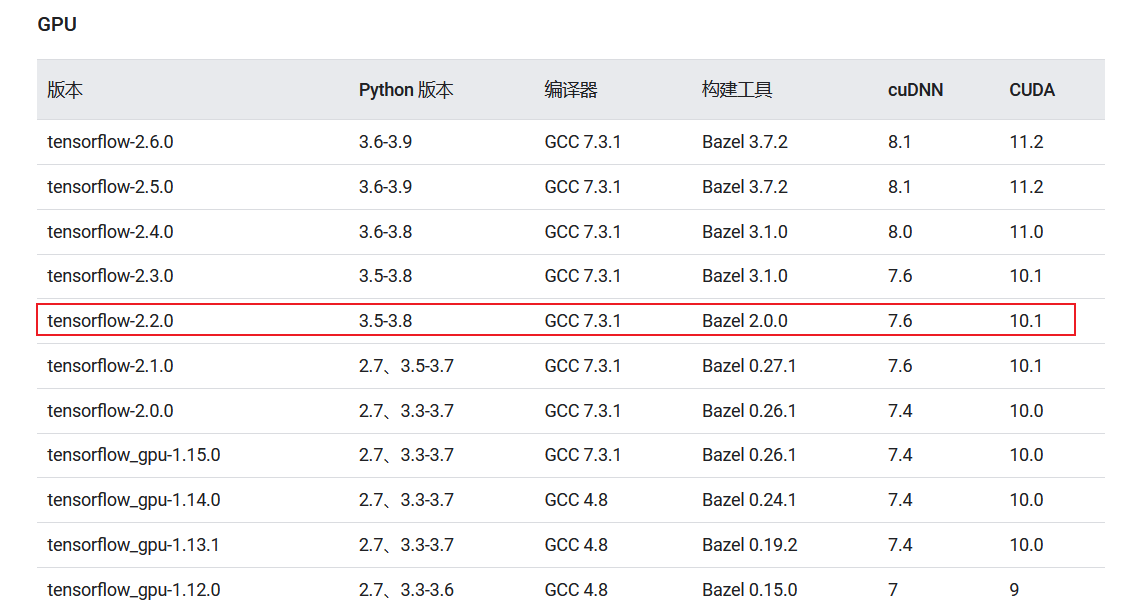conda create -n [env_name] python=[python version]詳細命令如下:
conda create -n tensorflow-2.2-py36 python=3.6輸出如下:
PS C:\Users\zhoushimin> conda create -n tensorflow-2.2-py36 python=3.6
Collecting package metadata (repodata.json): done
Solving environment: done


==> WARNING: A newer version of conda exists. <==
current version: 4.10.3
latest version: 4.12.0

Please update conda by running

$ conda update -n base -c defaults conda


## Package Plan ##

environment location: D:\Tools\Anaconda3\envs\tensorflow-2.2-py36

added / updated specs:
- python=3.6


The following packages will be downloaded:

package                    |            build
---------------------------|-----------------
certifi-2021.5.30          |   py36haa95532_0         142 KB  defaults
pip-21.2.2                 |   py36haa95532_0         2.1 MB  defaults
python-3.6.13              |       h3758d61_0        17.7 MB  defaults
setuptools-58.0.4          |   py36haa95532_0         976 KB  defaults
wincertstore-0.2           |   py36h7fe50ca_0          13 KB  defaults
------------------------------------------------------------
Total:        20.9 MB

The following NEW packages will be INSTALLED:

certifi            anaconda/pkgs/main/win-64::certifi-2021.5.30-py36haa95532_0
pip                anaconda/pkgs/main/win-64::pip-21.2.2-py36haa95532_0
python             anaconda/pkgs/main/win-64::python-3.6.13-h3758d61_0
setuptools         anaconda/pkgs/main/win-64::setuptools-58.0.4-py36haa95532_0
sqlite             anaconda/pkgs/main/win-64::sqlite-3.38.2-h2bbff1b_0
vc                 anaconda/pkgs/main/win-64::vc-14.2-h21ff451_1
vs2015_runtime     anaconda/pkgs/main/win-64::vs2015_runtime-14.27.29016-h5e58377_2
wheel              anaconda/pkgs/main/noarch::wheel-0.37.1-pyhd3eb1b0_0
wincertstore       anaconda/pkgs/main/win-64::wincertstore-0.2-py36h7fe50ca_0


Proceed ([y]/n)? y
等待執行完畢。
conda activate tensorflow-2.2-py36pip install tensorflow==2.2.0Successfully built termcolor
Installing collected packages: urllib3, pyasn1, idna, charset-normalizer, zipp, typing-extensions, six, rsa, requests, pyasn1-modules, oauthlib, cachetools, requests-oauthlib, importlib-metadata, google-auth, dataclasses, werkzeug, tensorboard-plugin-wit, protobuf, numpy, markdown, grpcio, google-auth-oauthlib, absl-py, wrapt, termcolor, tensorflow-estimator, tensorboard, scipy, opt-einsum, keras-preprocessing, h5py, google-pasta, gast, astunparse, tensorflow
Successfully installed absl-py-1.0.0 astunparse-1.6.3 cachetools-4.2.4 charset-normalizer-2.0.12 dataclasses-0.8 gast-0.3.3 google-auth-1.35.0 google-auth-oauthlib-0.4.6 google-pasta-0.2.0 grpcio-1.44.0 h5py-2.10.0 idna-3.3 importlib-metadata-4.8.3 keras-preprocessing-1.1.2 markdown-3.3.6 numpy-1.19.5 oauthlib-3.2.0 opt-einsum-3.3.0 protobuf-3.19.4 pyasn1-0.4.8 pyasn1-modules-0.2.8 requests-2.27.1 requests-oauthlib-1.3.1 rsa-4.8 scipy-1.4.1 six-1.16.0 tensorboard-2.2.2 tensorboard-plugin-wit-1.8.1 tensorflow-2.2.0 tensorflow-estimator-2.2.0 termcolor-1.1.0 typing-extensions-4.1.1 urllib3-1.26.9 werkzeug-2.0.3 wrapt-1.14.0 zipp-3.6.0創建gpu_tf_test.py,拷貝如下代碼:
import numpy as np
import tensorflow as tf
from tensorflow import keras
from tensorflow.keras.models import Sequential
from tensorflow.keras.layers import Dense
from tensorflow.keras.optimizers import SGD

import time

# config = tf.ConfigProto()
# config.gpu_options.allow_growth = True
# session = tf.Session(config=config)

# 啟用GPU
from tensorflow.compat.v1 import ConfigProto# tf 2.x的寫法
config =ConfigProto()
config.gpu_options.per_process_gpu_memory_fraction=0.9
tf.compat.v1.Session(config=config)

# 構建數據集
X_data = np.linspace(-1,1,1000)[:, np.newaxis]
noise = np.random.normal(0,0.05,X_data.shape)
y_data = np.square(X_data) + noise + 0.5

print("shape")
print(X_data.shape)

# 構建神經網絡

model = Sequential()
model.add(Dense(10, input_shape=(1,), kernel_initializer='normal', activation='relu'))
#model.add(Dense(5, activation='relu'))
# vs 分類為softmax激活
model.add(Dense(10000, kernel_initializer='normal'))
model.add(Dense(10000, kernel_initializer='normal'))
model.add(Dense(100, kernel_initializer='normal'))
model.add(Dense(1, kernel_initializer='normal'))
#sgd = SGD(lr=0.001)
model.compile(loss='mean_squared_error', optimizer="sgd") #adam
# 訓練 epoch = 10, 30, 50, view the results
start = time.time()
model.fit(X_data, y_data, epochs=50, batch_size=16, verbose=1)
end = time.time()

# 在原數據上預測
y_predict=model.predict(X_data)
#print(y_predict)
model.summary()

print("training time {}".format(end - start))
執行測試
# 切換至虛擬環境
conda activate tensorflow-2.2-py36
# 執行測試
python gpu_tf_test.py
輸出如下:
(tensorflow-2.2-py36) C:\Users\zhoushimin\Desktop>python gpu_test.py
2022-04-05 00:24:35.790114: I tensorflow/stream_executor/platform/default/dso_loader.cc:44] Successfully opened dynamic library cudart64_101.dll
2022-04-05 00:24:39.180693: I tensorflow/compiler/xla/service/service.cc:168] XLA service 0x211ab3407a0 initialized for platform Host (this does not guarantee
that XLA will be used). Devices:
2022-04-05 00:24:39.181152: I tensorflow/compiler/xla/service/service.cc:176]   StreamExecutor device (0): Host, Default Version
2022-04-05 00:24:39.185023: I tensorflow/stream_executor/platform/default/dso_loader.cc:44] Successfully opened dynamic library nvcuda.dll
2022-04-05 00:24:39.957288: I tensorflow/core/common_runtime/gpu/gpu_device.cc:1561] Found device 0 with properties:
pciBusID: 0000:01:00.0 name: GeForce GT 650M computeCapability: 3.0
coreClock: 0.835GHz coreCount: 2 deviceMemorySize: 2.00GiB deviceMemoryBandwidth: 59.60GiB/s
2022-04-05 00:24:39.958038: I tensorflow/stream_executor/platform/default/dso_loader.cc:44] Successfully opened dynamic library cudart64_101.dll
2022-04-05 00:24:39.965471: I tensorflow/stream_executor/platform/default/dso_loader.cc:44] Successfully opened dynamic library cublas64_10.dll
2022-04-05 00:24:39.972214: I tensorflow/stream_executor/platform/default/dso_loader.cc:44] Successfully opened dynamic library cufft64_10.dll
2022-04-05 00:24:39.975560: I tensorflow/stream_executor/platform/default/dso_loader.cc:44] Successfully opened dynamic library curand64_10.dll
2022-04-05 00:24:39.985029: I tensorflow/stream_executor/platform/default/dso_loader.cc:44] Successfully opened dynamic library cusolver64_10.dll
2022-04-05 00:24:39.989813: I tensorflow/stream_executor/platform/default/dso_loader.cc:44] Successfully opened dynamic library cusparse64_10.dll
2022-04-05 00:24:40.014427: I tensorflow/stream_executor/platform/default/dso_loader.cc:44] Successfully opened dynamic library cudnn64_7.dll
2022-04-05 00:24:40.016214: I tensorflow/core/common_runtime/gpu/gpu_device.cc:1657] Ignoring visible gpu device (device: 0, name: GeForce GT 650M, pci bus id: 0000:01:00.0, compute capability: 3.0) with Cuda compute capability 3.0. The minimum required Cuda capability is 3.5.
2022-04-05 00:24:40.063972: I tensorflow/core/common_runtime/gpu/gpu_device.cc:1102] Device interconnect StreamExecutor with strength 1 edge matrix:
2022-04-05 00:24:40.064381: I tensorflow/core/common_runtime/gpu/gpu_device.cc:1108]      0
2022-04-05 00:24:40.064707: I tensorflow/core/common_runtime/gpu/gpu_device.cc:1121] 0:   N
2022-04-05 00:24:40.068691: I tensorflow/compiler/xla/service/platform_util.cc:139] StreamExecutor cuda device (0) is of insufficient compute capability: 3.5 required, device is 3.0
2022-04-05 00:24:40.069704: I tensorflow/compiler/jit/xla_gpu_device.cc:161] Ignoring visible XLA_GPU_JIT device. Device number is 0, reason: Internal: no supported devices found for platform CUDA
shape
(1000, 1)
2022-04-05 00:24:40.099506: I tensorflow/core/common_runtime/gpu/gpu_device.cc:1561] Found device 0 with properties:
pciBusID: 0000:01:00.0 name: GeForce GT 650M computeCapability: 3.0
coreClock: 0.835GHz coreCount: 2 deviceMemorySize: 2.00GiB deviceMemoryBandwidth: 59.60GiB/s
2022-04-05 00:24:40.100197: I tensorflow/stream_executor/platform/default/dso_loader.cc:44] Successfully opened dynamic library cudart64_101.dll
2022-04-05 00:24:40.100541: I tensorflow/stream_executor/platform/default/dso_loader.cc:44] Successfully opened dynamic library cublas64_10.dll
2022-04-05 00:24:40.100821: I tensorflow/stream_executor/platform/default/dso_loader.cc:44] Successfully opened dynamic library cufft64_10.dll
2022-04-05 00:24:40.101140: I tensorflow/stream_executor/platform/default/dso_loader.cc:44] Successfully opened dynamic library curand64_10.dll
2022-04-05 00:24:40.101432: I tensorflow/stream_executor/platform/default/dso_loader.cc:44] Successfully opened dynamic library cusolver64_10.dll
2022-04-05 00:24:40.101674: I tensorflow/stream_executor/platform/default/dso_loader.cc:44] Successfully opened dynamic library cusparse64_10.dll
2022-04-05 00:24:40.101915: I tensorflow/stream_executor/platform/default/dso_loader.cc:44] Successfully opened dynamic library cudnn64_7.dll
2022-04-05 00:24:40.103257: I tensorflow/core/common_runtime/gpu/gpu_device.cc:1657] Ignoring visible gpu device (device: 0, name: GeForce GT 650M, pci bus id: 0000:01:00.0, compute capability: 3.0) with Cuda compute capability 3.0. The minimum required Cuda capability is 3.5.
2022-04-05 00:24:40.104045: I tensorflow/core/common_runtime/gpu/gpu_device.cc:1102] Device interconnect StreamExecutor with strength 1 edge matrix:
2022-04-05 00:24:40.104239: I tensorflow/core/common_runtime/gpu/gpu_device.cc:1108]
2022-04-05 00:24:40.139180: W tensorflow/core/framework/cpu_allocator_impl.cc:81] Allocation of 400000000 exceeds 10% of free system memory.
2022-04-05 00:24:41.717374: W tensorflow/core/framework/cpu_allocator_impl.cc:81] Allocation of 400000000 exceeds 10% of free system memory.
2022-04-05 00:24:41.799759: W tensorflow/core/framework/cpu_allocator_impl.cc:81] Allocation of 400000000 exceeds 10% of free system memory.
Epoch 1/50
2022-04-05 00:24:42.666531: W tensorflow/core/framework/cpu_allocator_impl.cc:81] Allocation of 400000000 exceeds 10% of free system memory.
2022-04-05 00:24:42.841301: W tensorflow/core/framework/cpu_allocator_impl.cc:81] Allocation of 400000000 exceeds 10% of free system memory.
63/63 [==============================] - 36s 567ms/step - loss: 0.2708
Epoch 2/50
63/63 [==============================] - 35s 559ms/step - loss: 0.0703
Epoch 3/50
63/63 [==============================] - 39s 614ms/step - loss: 0.0350
Epoch 4/50
63/63 [==============================] - 41s 643ms/step - loss: 0.0140
Epoch 5/50
63/63 [==============================] - 41s 650ms/step - loss: 0.0144
Epoch 6/50
30/63 [=============>................] - ETA: 21s - loss: 0.0091
從日志中可以看到顯卡GeForce GT 650M已經加載成功了,cuda也加載成功了,因為GPU性能較弱,僅3.0,不滿足最小要求3.5,直接使用的cpu在運行。
總體來說,深度學習安裝環境的安裝還是比較麻煩的,涉及到
一般來說,一個項目一個環境,避免環境沖突。一個項目一個環境可以通過anaconda來實現,也可以使用docker來實現隔離。有一些框架在windows平臺支持不好,例如目標檢測框架MMDetection,盡可能還是使用linux環境來做開發。
以上是我的學習總結,有問題歡迎交流。
參考鏈接:
推薦閱讀:
[1] OBJECT DETECTION API: https://github.com/tensorflow/models/blob/master/research/object_detection/g3doc/tf2.md
[2] CUDA與cuDNN:https://www.jianshu.com/p/622f47f94784: https://www.jianshu.com/p/622f47f94784